使用 Python 和 OpenCV 执行图像注释
深度学习中的常见任务之一是_对象检测_,这是在给定图像中定位特定对象的过程。对象检测的一个示例是检测图像中的汽车,您可以在其中计算图像中检测到的汽车总数。在需要分析特定交汇点的交通流的情况下,这可能很有用。
为了训练深度学习模型来检测特定对象,您需要为模型提供一组训练图像,并将图像中特定对象的坐标全部映射出来。此过程称为_图像注释_。图像注释为图像中存在的对象分配标签,并将所有对象标记出来。
在本文中,我将向您展示如何使用 Python 和 OpenCV 来注释您的图像——您将使用鼠标标记出您正在注释的对象,应用程序将在对象周围绘制一个边界矩形。然后,您可以查看已映射的对象的坐标,并选择将其保存到日志文件中。
使用 OpenCV 显示图像
首先,创建一个文本文件并将其命名为 bounding.py。然后,用以下语句填充它:
import argparse
import cv2

ap = argparse.ArgumentParser()
ap.add_argument("-i", "--image", required = True, help = "Path to image")
args = vars(ap.parse_args())

# load the image
image = cv2.imread(args["image"])

# reference to the image
image_clone = image

# loop until the 'q' key is pressed
while True:
    # display the image
    cv2.imshow("image", image)

    # wait for a keypress
    key = cv2.waitKey(1)
    if key == ord("c"):
        break

# close all open windows
cv2.destroyAllWindows()
上面的 Python 控制台应用程序从控制台接收一个参数,该参数是要显示的图像的名称。获取镜像名称后,您将使用 OpenCV 显示镜像。同时,您希望克隆映像,以便以后可以使用它。要停止程序,您可以按键盘上的 Ctrl-C 组合键。
若要运行该程序,请转到“终端”并键入以下命令:
$ python bounding.py -i Cabs.jpg
上述Cabs.jpg文件可以从 https://en.wikipedia.org/wiki/Taxi#/media/File:Cabs.jpg 下载。
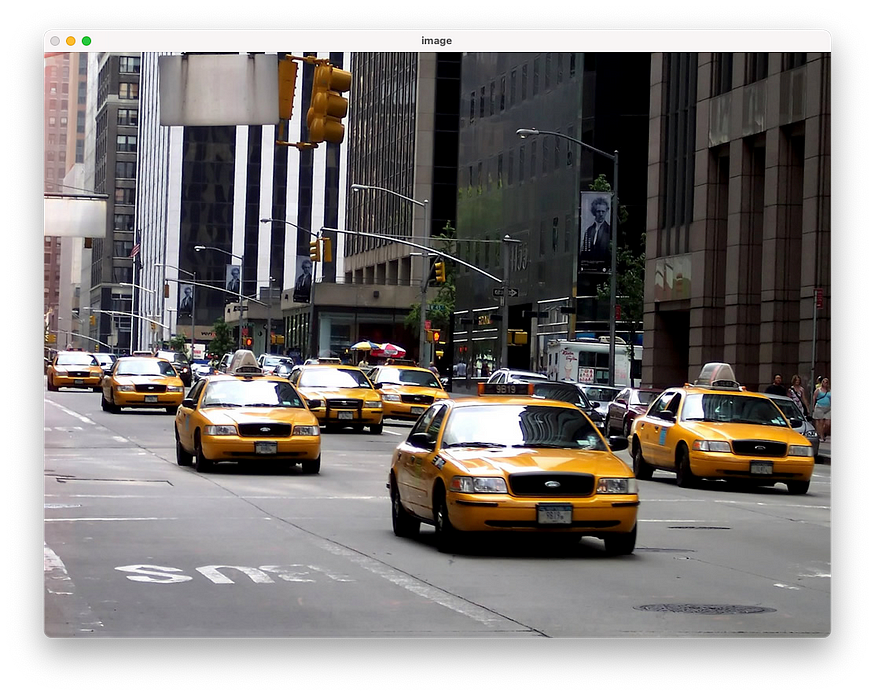
现在应显示图像:
处理鼠标事件
我们希望用户能够使用鼠标单击图像,然后在图像上拖动以选择特定的_感兴趣区域_ (ROI)。为此,让我们在程序中添加两个全局变量:
import argparse
import cv2

# to store the points for region of interest
roi_pt = []

# to indicate if the left mouse button is depressed
is_button_down = False
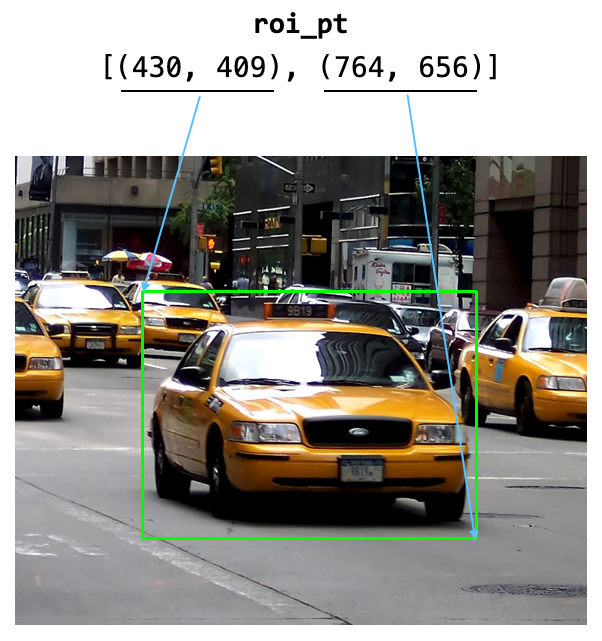
下图显示了如何存储 ROI 的坐标:roi_pt
现在,您将定义一个函数名称作为鼠标单击的处理程序。此函数包含五个参数 — 、 、 、 和 。在本练习中,我们将仅使用前三个参数:draw_rectangle()eventxyflagsparam
def draw_rectangle(event, x, y, flags, param):
    global roi_pt, is_button_down

    if event == cv2.EVENT_MOUSEMOVE and is_button_down:
        global image_clone, image

        # get the original image to paint the new rectangle
        image = image_clone.copy()

        # draw new rectangle
        cv2.rectangle(image, roi_pt[0], (x,y), (0, 255, 0), 2)

    if event == cv2.EVENT_LBUTTONDOWN:
        # record the first point
        roi_pt = [(x, y)]
        is_button_down = True

    # if the left mouse button was released
    elif event == cv2.EVENT_LBUTTONUP:
        roi_pt.append((x, y))     # append the end point

        # ======================
        # print the bounding box
        # ======================
        # in (x1,y1,x2,y2) format
        print(roi_pt)

        # in (x,y,w,h) format
        bbox = (roi_pt[0][0],
                roi_pt[0][1],
                roi_pt[1][0] - roi_pt[0][0],
                roi_pt[1][1] - roi_pt[0][1])
        print(bbox)

        # button has now been released
        is_button_down = False

        # draw the bounding box
        cv2.rectangle(image, roi_pt[0], roi_pt[1], (0, 255, 0), 2)
        cv2.imshow("image", image)
在上面的函数中:
- 当按下鼠标左键 () 时,记录 ROI 的第一个点。然后,将变量设置为,以便在用户在按下鼠标左键的同时移动鼠标时可以开始绘制矩形。cv2.EVENT_LBUTTONDOWNis_button_downTrue
- 当用户在按住鼠标左键 () 的情况下移动鼠标时,您现在将在原始图像的副本上绘制一个矩形。您需要在克隆图像上绘制,因为当用户移动鼠标时,您还需要删除之前绘制的上一个矩形。因此,实现此目的的最简单方法是丢弃上一个图像并使用克隆图像绘制新矩形。cv2.EVENT_MOUSEMOVE and is_button_down
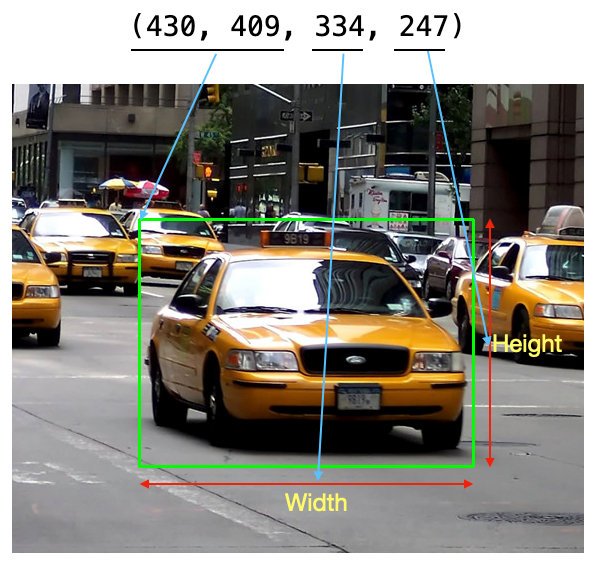
- 当用户最终松开鼠标左键 () 时,将 ROI 的端点追加到 。然后打印出边界框坐标。对于一些深度学习包,边界框坐标的格式是_(x,y,width,height),_所以我也用这种格式计算了ROI坐标:cv2.EVENT_LBUTTONUProi_pt
- 最后,绘制 ROI 的边界框
若要将鼠标事件与其事件处理程序连接起来,请添加以下语句:
# reference to the image
image_clone = image

# ======ADD the following======
# setup the mouse click handler
cv2.namedWindow("image")
cv2.setMouseCallback("image", draw_rectangle)
# =============================

# loop until the 'q' key is pressed
while True:
再次运行程序,您现在可以从图像中选择 ROI,并显示一个矩形:
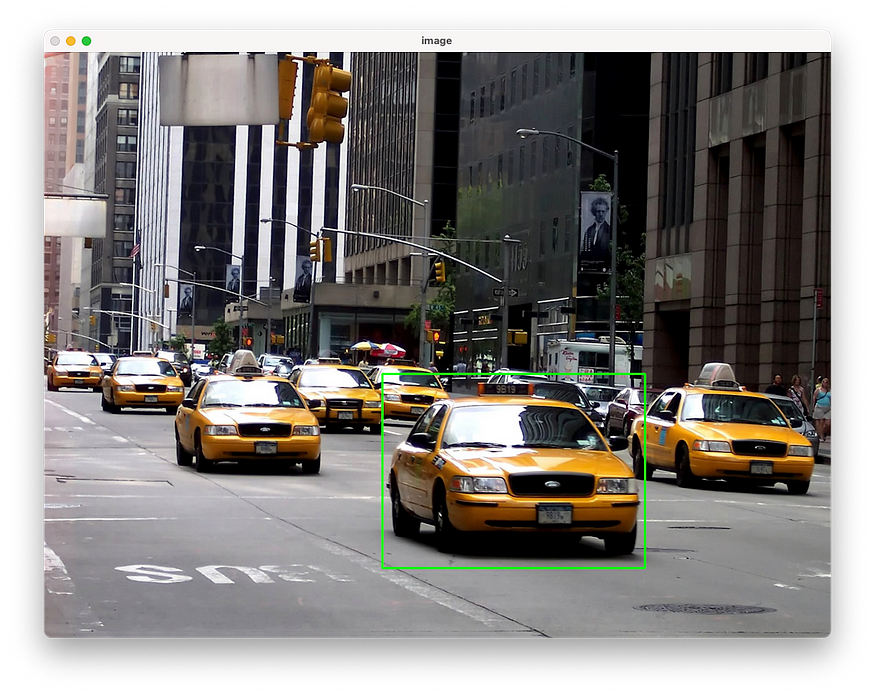
图片由作者提供
同时,ROI的坐标也将显示:
[(430, 409), (764, 656)]
(430, 409, 334, 247)
为方便起见,以下是完整的 Python 程序:
import argparse
import cv2

# to store the points for region of interest
roi_pt = []

# to indicate if the left mouse button is depressed
is_button_down = False

def draw_rectangle(event, x, y, flags, param):
    global roi_pt, is_button_down

    if event == cv2.EVENT_MOUSEMOVE and is_button_down:
        global image_clone, image

        # get the original image to paint the new rectangle
        image = image_clone.copy()

        # draw new rectangle
        cv2.rectangle(image, roi_pt[0], (x,y), (0, 255, 0), 2)

    if event == cv2.EVENT_LBUTTONDOWN:
        # record the first point
        roi_pt = [(x, y)]
        is_button_down = True

    # if the left mouse button was released
    elif event == cv2.EVENT_LBUTTONUP:
        roi_pt.append((x, y))     # append the end point

        # ======================
        # print the bounding box
        # ======================
        # in (x1,y1,x2,y2) format
        print(roi_pt)

        # in (x,y,w,h) format
        bbox = (roi_pt[0][0],
                roi_pt[0][1],
                roi_pt[1][0] - roi_pt[0][0],
                roi_pt[1][1] - roi_pt[0][1])
        print(bbox)

        # button has now been released
        is_button_down = False

        # draw the bounding box
        cv2.rectangle(image, roi_pt[0], roi_pt[1], (0, 255, 0), 2)
        cv2.imshow("image", image)

ap = argparse.ArgumentParser()
ap.add_argument("-i", "--image", required = True, help = "Path to image")
args = vars(ap.parse_args())

# load the image
image = cv2.imread(args["image"])

# reference to the image
image_clone = image

# setup the mouse click handler
cv2.namedWindow("image")
cv2.setMouseCallback("image", draw_rectangle)

# loop until the 'q' key is pressed
while True:
    # display the image
    cv2.imshow("image", image)

    # wait for a keypress
    key = cv2.waitKey(1)
    if key == ord("c"):
        break

# close all open windows
cv2.destroyAllWindows()
在这篇简短的文章中,我演示了如何通过选择图像中的对象来注释图像。当然,一旦对象的坐标被映射出来,你需要将其存储在外部文件(如JSON或CSV文件)中。为此,我将把它留给读者作为练习。让我知道这是否有用,或者您在日常工作中使用了哪些注释工具。